How WebSockets Work: A Complete Real-Time Connection Walkthrough
In the early days of the web, the browser was a simple document viewer. You requested a page, the server rendered it, and the connection closed. This request-response cycle is the core of HTTP (Hypertext Transfer Protocol).
However, as web applications evolved into rich, interactive experiences—like real-time chat, live financial tickers, collaborative editing, and multiplayer gaming—the traditional HTTP model began to show its limitations.
To get live updates, developers initially relied on workarounds:
- Short Polling: The browser repeatedly sends HTTP requests to the server every few seconds to ask for new data. This creates massive header overhead and wastes server resources.
- Long Polling (Comet): The browser sends a request, and the server holds it open until new data is available. Once data is sent, the connection closes, and the browser immediately opens a new request. This is complex to manage and still incurs significant connection setup overhead.
WebSockets solved these limitations by introducing a standardized protocol for persistent, bi-directional, full-duplex communication over a single TCP connection.
What is a WebSocket?
WebSockets (defined in RFC 6455) operate alongside HTTP. While HTTP is a stateless protocol where only the client can initiate requests, a WebSocket connection remains open indefinitely, allowing both the client and the server to send data to each other at any time with minimal latency.
Here is the fundamental rule of WebSockets:
Once established, either side can send messages at any time without initiating a new connection request.
Step-by-Step Walkthrough: The Connection Lifecycle
A WebSocket connection goes through three distinct phases: the Handshake, Data Transfer, and the Closure.
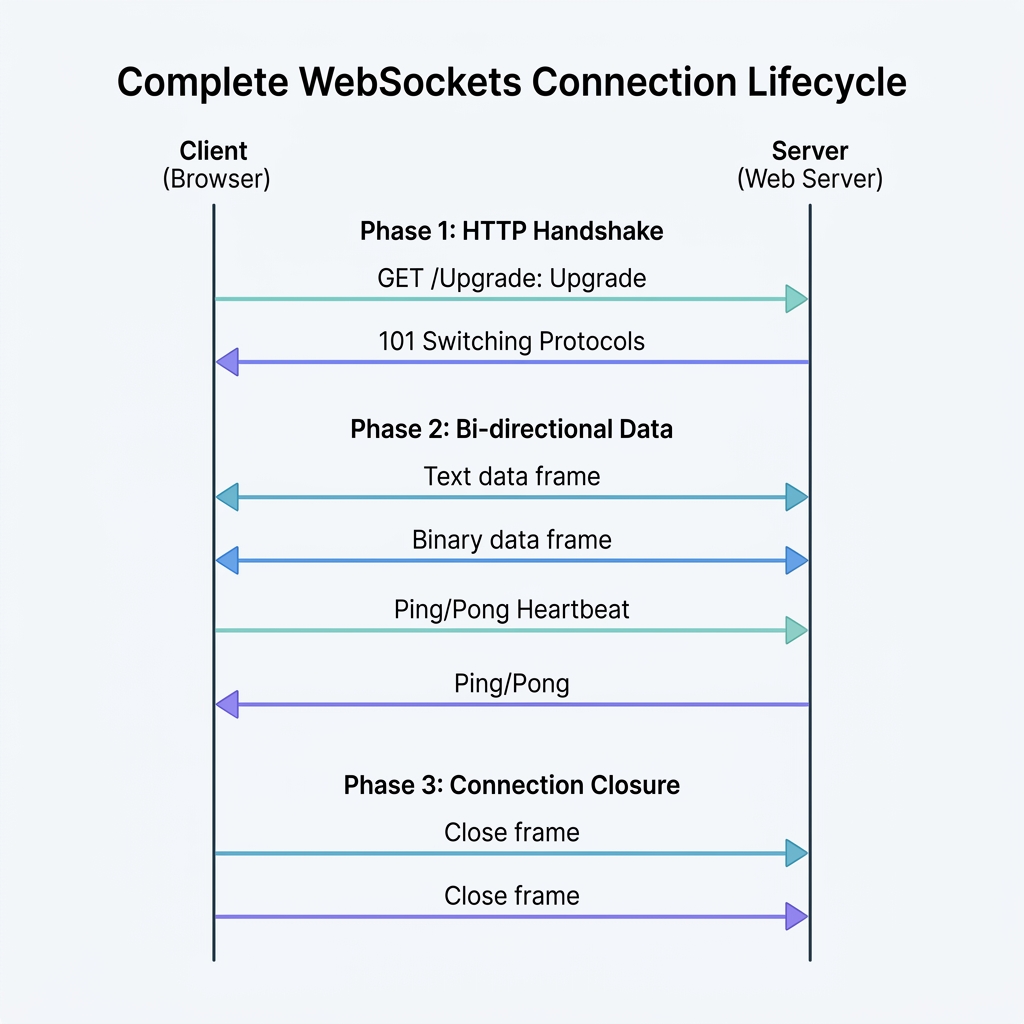
1. The HTTP Handshake (Protocol Upgrade)
Since firewalls and routers are configured to allow standard web traffic on ports 80 (HTTP) and 443 (HTTPS), WebSockets start their journey as a standard HTTP/1.1 request. This is called the Upgrade Handshake.
The Client Request
The client sends an HTTP GET request with specific headers requesting a protocol switch:
GET /chat HTTP/1.1
Host: server.example.com
Upgrade: websocket
Connection: Upgrade
Sec-WebSocket-Key: dGhlIHNhbXBsZSBub25jZQ==
Sec-WebSocket-Version: 13
Origin: https://example.com
Upgrade: websocketandConnection: Upgrade: Tell the server that the client wants to switch protocols.Sec-WebSocket-Key: A random, 16-byte value encoded in Base64. It is used to prove that the server received the handshake and understands the WebSocket protocol.Sec-WebSocket-Version: Specifies the WebSocket protocol version (usually 13).Origin: Used by the server to decide whether to allow the connection (security check against unauthorized sites).
The Server Response
If the server supports WebSockets, it validates the request and responds with an HTTP status code 101 Switching Protocols:
HTTP/1.1 101 Switching Protocols
Upgrade: websocket
Connection: Upgrade
Sec-WebSocket-Accept: s3pPLMBiTxaQ9kYGzzhZRbK+xOo=
- How the Server Computes
Sec-WebSocket-Accept:- The server takes the client’s
Sec-WebSocket-Key(dGhlIHNhbXBsZSBub25jZQ==). - It concatenates it with a standard magic GUID:
"258EAFA5-E914-47DA-95CA-C5AB0DC85B11". - It computes the SHA-1 hash of the combined string.
- It encodes the resulting hash in Base64.
- If the client verifies this value matches its expectations, the handshake succeeds, the HTTP connection switches to a raw TCP socket, and both sides transition to the WebSocket protocol.
- The server takes the client’s
2. Data Framing and Transfer
Unlike HTTP, which sends plain text headers followed by a body, WebSockets transmit data in structured binary packets called frames.
A WebSocket frame has a very lightweight header (ranging from 2 to 14 bytes) followed by the payload. This header contains:
- FIN bit (1 bit): Indicates if this is the final frame of a message.
- Opcode (4 bits): Defines the type of frame:
0x1: Text frame (UTF-8 encoded)0x2: Binary frame0x8: Connection close request0x9: Ping0xA: Pong
- Mask bit (1 bit): Specifies whether the payload data is masked.
- Payload Length: The size of the data.
- Masking Key (4 bytes): Crucial Security Requirement: All frames sent from the client to the server must be masked (XOR-obfuscated) using a random 4-byte key. This prevents proxy caches from reading the traffic or executing cache poisoning attacks. Server-to-client frames must not be masked.
Heartbeats (Ping/Pong)
To prevent routers and load balancers from closing idle connections, either side can send a Ping frame. The receiving side must reply immediately with a Pong frame containing the same payload.
3. Closing the Connection
To close a connection cleanly:
- One peer sends a
Closeframe containing a status code (e.g.,1000for normal closure,1006for abnormal closure) and an optional text reason. - The other peer responds with its own
Closeframe. - The underlying TCP socket is closed.
Code Example: Node.js WebSocket Implementation
To see WebSockets in action, let’s write a simple Node.js application. We will create a local WebSocket server that echoes back any message it receives, along with a client script to connect to it.
The WebSocket Server (server.js)
const { WebSocketServer } = require('ws');
const http = require('http');

// 1. Create a standard HTTP server
const server = http.createServer((req, res) => {
    res.writeHead(200, { 'Content-Type': 'text/plain' });
    res.end('HTTP Server running. Use WebSocket to connect.\n');
});

// 2. Attach a WebSocket Server to the HTTP Server
const wss = new WebSocketServer({ server });

wss.on('connection', (ws, req) => {
    const clientIp = req.socket.remoteAddress;
    console.log(`[Server] New client connected from ${clientIp}`);

    // Send a welcome message to the client
    ws.send(JSON.stringify({ type: 'welcome', message: 'Connected to Ghaznix WebSocket server!' }));

    // Listen for incoming messages from this client
    ws.on('message', (message) => {
        console.log(`[Server] Received: ${message}`);

        // Parse the message (assuming JSON)
        try {
            const data = JSON.parse(message);
            // Echo the message back with an uppercase greeting
            ws.send(JSON.stringify({
                type: 'echo',
                message: `Server echo: ${data.text.toUpperCase()}`,
                timestamp: new Date().toISOString()
            }));
        } catch (e) {
            ws.send(JSON.stringify({ type: 'error', message: 'Invalid JSON format' }));
        }
    });

    // Handle client disconnect
    ws.on('close', (code, reason) => {
        console.log(`[Server] Client disconnected (Code: ${code}, Reason: ${reason.toString() || 'None'})`);
    });

    ws.on('error', (error) => {
        console.error(`[Server] Socket error: ${error.message}`);
    });
});

// Start listening on port 8080
server.listen(8080, () => {
    console.log('WebSocket server is listening on ws://localhost:8080');
});
The Browser Client Client-Side JavaScript
You can run this client directly in your browser’s console:
// 1. Establish connection to the server
const socket = new WebSocket('ws://localhost:8080');

// 2. Connection opened handler
socket.addEventListener('open', (event) => {
    console.log('[Client] Connected to server.');

    // Send a message as a JSON string
    const payload = JSON.stringify({ text: 'hello, server!' });
    socket.send(payload);
    console.log(`[Client] Sent: ${payload}`);
});

// 3. Listen for messages from the server
socket.addEventListener('message', (event) => {
    const response = JSON.parse(event.data);
    console.log('[Client] Received message from server:', response);
});

// 4. Listen for connection close
socket.addEventListener('close', (event) => {
    console.log(`[Client] Connection closed (Code: ${event.code})`);
});

// 5. Listen for errors
socket.addEventListener('error', (error) => {
    console.error('[Client] WebSocket Error:', error);
});
HTTP vs. WebSockets: A Detailed Comparison
| Feature | HTTP/1.1 | WebSockets |
|---|---|---|
| Communication | Unidirectional (Client-initiated) | Bi-directional (Either client or server) |
| Connection Model | Request-Response (short-lived) | Persistent (long-lived) |
| Overhead | High (headers sent with every request) | Very low (minimal framing overhead) |
| State | Stateless | Stateful (connection context maintained) |
| Protocol | http:// or https:// |
ws:// or wss:// |
| Best For | Fetching documents, REST APIs | Real-time chats, dashboards, live feeds |
Security Considerations for WebSockets
Because WebSockets bypass standard HTTP routing after the handshake, they introduce unique security vectors:
- Use WebSocket Secure (
wss://): Always run WebSockets over TLS/SSL (using port 443). WSS encrypts the framing payload, preventing eavesdropping and middleman tampering. - Origin Validation: WebSockets are not restricted by Same-Origin Policy (SOP). Always validate the
Originheader on the server during the handshake to prevent unauthorized access. - Authentication on Handshake: Authenticate users before the connection is established. This is typically done by sending a ticket token (like a JWT) in query parameters, or verifying session cookies.
- Input Sanitization: Treat every message received through WebSockets as untrusted input. Validate and sanitize payloads to prevent Cross-Site Scripting (XSS).
Summary
WebSockets changed real-time web applications by removing the overhead of traditional HTTP polling. By maintaining a single persistent TCP connection, it enables instant bi-directional messaging, powering today’s live dashboards, multiplayer games, and chat apps. Understanding the HTTP upgrade, the framing architecture, and the crucial security practices ensures you build fast, secure real-time services.
Explore more developer tutorials and guides on the Ghaznix Blog →